


Here is the scene at least once a week at my house. We’ve come in from some outside play in the cool of the morning, when my toddler asks for juice in a way that is too sweet to deny (i.e., “I NEED juice, Mommy”). Of course, I could reach for a juice box from the fridge — and that would be fine — but I have a few minutes before the baby wakes up from her nap, so I opt to whip up some from fresh.
With the right tools, juicing is a quick, minimally messy, super easy way to get fresh vitamins and nutrients into my picky toddler — who would never eat a whole, raw zucchini but has yet to balk at drinking one. It’s so easy, in fact, it can be broken down into three steps: assemble, wash, and juice.

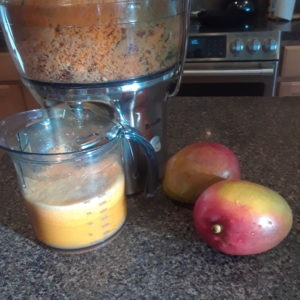
The most important tool for this process is, of course, your juicer. (I have the Juice Fountain® Compact by Breville). Most juicers can process whole fruits and veggies, including cores, small seeds, and thin peels. Because you can juice almost every part (except large fruit stones, tough outer skins, and thick peels), it’s best to use organic, in-season produce. Simply rinse your produce, feed it into the chute, and let ‘er rip!
Yes, it’s that easy. Don’t believe me? Let’s break it down within the context of the above case study.
1. Assemble
Your toddler has asked for juice, and you can deliver with about 20 minutes of concerted effort — approximately the amount of time left for the baby’s typical morning nap. You’ve got this, mama.
The first step to juicing is easy as gathering the parts (for example: motor, base, micro mesh basket, cover, pusher, jug, and froth separator) — assuming they’re all cleaned and returned to their proper place — and snap-click-you’re-done. It helps to arrange your kitchen in a way that’s conducive to juicing — juicer parts stored near the sink, adequate counter space, and a nearby trash receptacle.
My juicing station is for some reason on the opposite side of the kitchen to where I store my juicer, through an obstacle course of a squirming toddler and the toys currently failing to occupy her attention. When I reach it, I invariably remember the key to the necessarily complicated, child safety-locked cabinet is back on the counter by the sink. Re-navigate obstacle course, retrieve key, and resume mission.
Don’t forget the paper towels for an inevitable clean-up here or there, as well as the (optional) cutting board and knife. Around the time you get the final parts in place, your toddler will remind you of her initial request for juice. Calmly tell her it will take “just a few minutes, sweetie.”
2. Wash
Get out your fruits and vegetables. The total volume depends on the capacity of both your juicer — and patience. My machine can process three-to-four pounds of food before the basket must be emptied of pulp. I typically juice four or five apples, one or two pounds of carrots, an orange, a cucumber or zucchini, a generous handful of spinach or similar greens, a red bell pepper, and a nub of ginger or turmeric root.
Your juicer’s instruction manual should include some basic guides for the best way to prepare your produce. If you buy organic produce, there is no need to peel or core much of anything. Juicing is a great way to use up overripe fruit or vegetable scraps. Give it all a good, thorough rinse (because we see you, stranger-at-Sprouts-who-touches-ALL-the-produce). Spot check for overly bruised or moldy bits, and cut away as needed.
This is the point in the process when your toddler tells you she will settle for water if you get it for her RIGHT NOW, usually to the accompaniment of a chorus of “mommieeee, mommieeee . . .” or a persistent shove mid-thigh-level on your person. (My daughter’s favorite position for this step is squished between the front of my legs and the island cabinet doors — which is oh, so comfortable for us both.) Maybe toss her a CLIF Kid Zbar® or a handful of fiber-rich prunes to keep her occupied while you finish up.
3. Juice
Feed fruits and veggies systematically into the chute or opening of your juicer, forcing them downward with the provided food pusher (NOT your bare fingers, despite the distractions in the room and a growing sense of urgency to get this DONE). Cut any oversized produce into smaller portions. Remember to set the knife back down well out of little fingers’ reach.
Unless you spring for a large capacity juicer, you may need to stop and empty the basket of pulp once or twice. PSA: Unplug the appliance before detaching the cover and/or mesh basket — even though it adds precious seconds to the process. Those tiny, metal teeth are suuuuper sharp and can reduce a fat carrot to a clump of dry pulp in less than a second. There is no need to add an emergency room visit to the juicing experience. Re-attach all parts and plug the unit back in before resuming.
At this point, your toddler will declare prunes and all varieties of cereal bar “gross-y, gross-y” — and hurl them at the recently cleaned floor. The baby monitor pops to life with a gentle whine. Eye-twitch.
Mechanically process your way through so. much. produce while the cries increase in urgency over the monitor. Empty dry pulp and spoon the foam directly into the trash can, despite a nagging feeling of wastefulness. Pulped zucchini for healthy muffins? Fodder for compost? Don’t overthink it. All we know for sure is there’s a screaming baby in the next room, and suddenly we’re way behind on dinner prep.
Proudly present your fresh, organic juice to the toddler who announces she really wanted milk all along. Abandon the pulp-flecked and foam-crusted dishes in the sink to — ironically — go feed the baby. Milk. From your own body. No juicing or pressing necessary.


